HTML Lists:

The type of Lists in the HTML:
-
Ordered lists:
Ordered listes will give Orders or marks to the items inside, items will be marked with numbers by default.
An ordered list starts with the <ol> tag. Each list item starts with the <li> tag.
Ordered listes Example:
    <ol>
        <li>Cats</li>
        <li>Dogs</li>
    </ol>
-
Unordered lists:
Unordered listes will not give Orders or marks to the items inside, The list items will be marked with bullets (small black circles) by default.
An unordered list starts with the <ul> tag. Each list item starts with the <li> tag.
Unordered listes Example:
    <ul>
        <li>Cats</li>
        <li>Dogs</li>
    </ul>
-
Definition lists:
A description list is a list of terms, with a description of each term.
The <dl> tag defines the description list, the <dt> tag defines the term (name), and the <dd> tag describes each term:
Definition listes Example:
    <dl>
        <dt>Cats</dt>
        <dd>- animals</dd>
        <dt>Dogs</dt>
        <dd>- animals</dd>
    </dl>
Nested Lists:

You can put a list inside the li tag, and this is the Nested Lists and browsers display nested lists indented further than the parent list.
Nested listes Example:
    <ol>
        list a
        <li>
            <ul>
                Nested List
                <li>a</li>
                <li>b</li>
                <li>c</li>
            <ul/>
        </li>
    </ol>
CSS:
Box Dimensions:
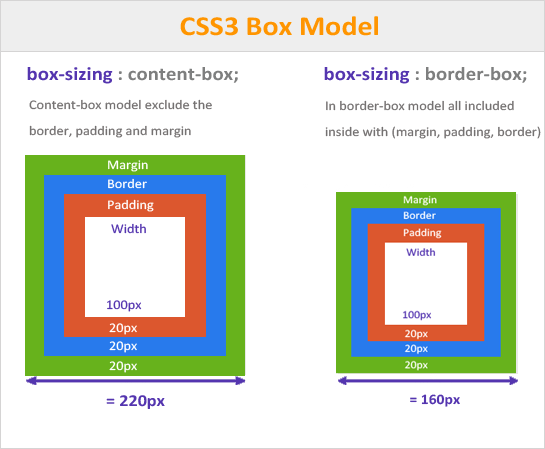
The CSS box-sizing property allows us to include the padding and border in an element’s total width and height.
You can use pixels, percentages, or ems. Traditionally, pixels have been the most popular method because they allow designers to accurately control their size and the size of the box is relative to the size of the browser window when you use percentages.
When you use ems, the size of the box is based on the size of text within it. Designers have recently started to use percentages and ems more for measurements as they try to create designs that are flexible across devices which have different-sized screens.
-
width: width + padding + border = actual width of an element
-
height: height + padding + border = actual height of an element
Box Dimensions width + height Example:
div{
    height:40px;
    width:70px;
}
Limiting Width
min-width, max-width:
The max-width CSS property sets the maximum width of an element. It prevents the used value of the width property from becoming larger than the value specified by max-width.
If the content is larger than the maximum width, it will automatically change the height of the element.
If the content is smaller than the maximum width, the max-width property has no effect.
max-width Example:
div{
    max-width: 150px;
}
The min-width property defines the minimum width of an element.
If the content is smaller than the minimum width, the minimum width will be applied.
min-width Example:
div{
    min-width: 150px;
}
Limiting Height
min-height, max-height
The min-height property defines the minimum height of an element.
If the content is smaller than the minimum height, the minimum height will be applied.
If the content is larger than the minimum height, the min-height property has no effect.
Limiting Height Example:
div{
    min-height: 150px;
}
The max-height property defines the maximum height of an element.
If the content is larger than the maximum height, it will overflow. How the container will handle the overflowing content is defined by the overflow property.
If the content is smaller than the maximum height, the max-height property has no effect.
max-height Example:
div{
    max-height: 150px;
}
Overflowing Content
The CSS overflow property controls what happens to content that is too big to fit into an area.
-
hidden: This property simply hides any extra content that does not fit in the box.
-
scroll: This property adds a scrollbar to the box so that users can scroll to see the missing content.
Border, Margin & Padding
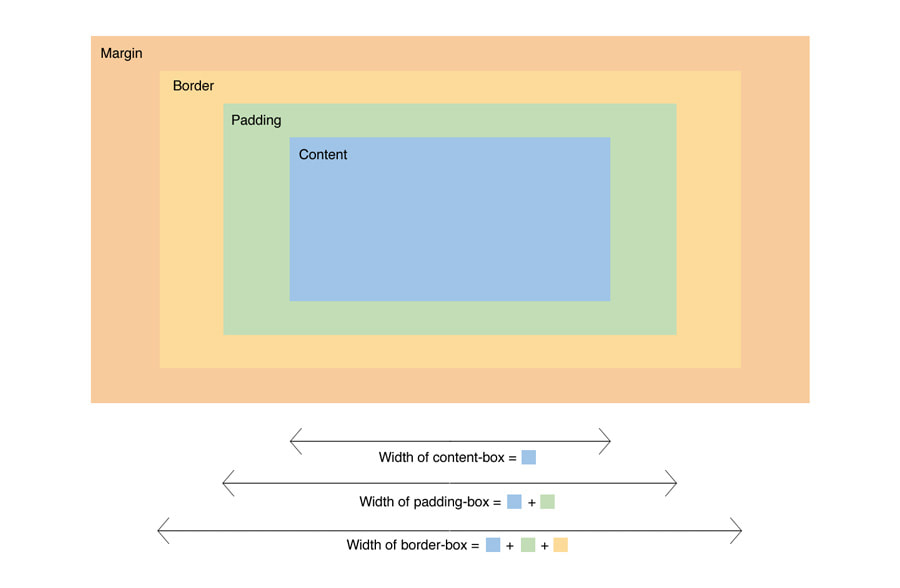
All HTML elements can be considered as boxes. In CSS, the term “box model” is used when talking about design and layout.
The CSS box model is essentially a box that wraps around every HTML element. It consists of: margins, borders, padding, and the actual content. The image below illustrates the box model:
-
Content - The content of the box, where text and images appear
-
Padding - Clears an area around the content. The padding is transparent
-
Border - A border that goes around the padding and content:
-
Border Width The border-width property is used to control the width of a border.
-
Border Width: The border-width property is used to control the width of a border.
-
Border Style: You can control the style of a border using the border-style property.
-
Border Color: You can specify the color of a border using either RGB values, hex codes or CSS color names (as you saw on pages 251-252).
-
Shorthand: The border property allows you to specify the width, style and color of a border in one property (and the values should be coded in that specific order).
-
-
Margin - Clears an area outside the border. The margin is transparent
Example:
div {
  border: 15px solid green;
  padding: 50px;
  margin: 20px;
}
CSS3: Border Images
border-image
Specify an image as the border around an element:
Example:
#borderimg {
  border-image: url(border.png) 30 round;
}
Box Shadows
To add shadows to elements:
Example:
#example1 {
  box-shadow: 5px 10px;
}
Border Radius

TO add rounded corners to the elements.
Example:
#example1 {
  border: 2px solid red;
  border-radius: 25px;
}
JS:
Basic JavaScript Instructions
A computer program is a list of “instructions” to be “executed” by a computer.
In a programming language, these programming instructions are called statements.
A JavaScript program is a list of programming statements.
Loops allow statements to be repeated
- The code to be repeated is in the loop body
- One repetition of the body is called an iteration
- Loops are structurally similar to if statements
- The loop control statement(s) are contained in ()s after the keyword
- The loop body is contained in {}s
JS switch
The switch statement is used to perform different actions based on different conditions.
Use the switch statement to select one of many code blocks to be executed.
Example
switch (new Date().getDay()) {
  case 0:
    day = "Sunday";
    break;
  case 1:
    day = "Monday";
    break;
  case 2:
     day = "Tuesday";
    break;
  case 3:
    day = "Wednesday";
    break;
  case 4:
    day = "Thursday";
    break;
  case 5:
    day = "Friday";
    break;
  case 6:
    day = "Saturday";
}